Friday 21 February 2020

Save Home & Work Address on Google Maps For easy direction

Google Maps allows you to set home and work locations for quick access to navigation. Actually, these two locations are so central to the Maps experience that if you do not have both saved, the application are often a touch naggy about it. But if you're employed from home, there's only one address to use, so what are you alleged to do?

You'd think Google Maps would allow you to save an equivalent address as both your home and workplace, but inputting your home location as your work address will remove its "Home" label, and vice versa. So to urge around this, you will have to use an alternate method. It doesn't offer you any notable new functionality, but once you've set your locations this manner , Maps will a minimum of stop asking you to "Set work address."

Setting Your Home as Your Work Location

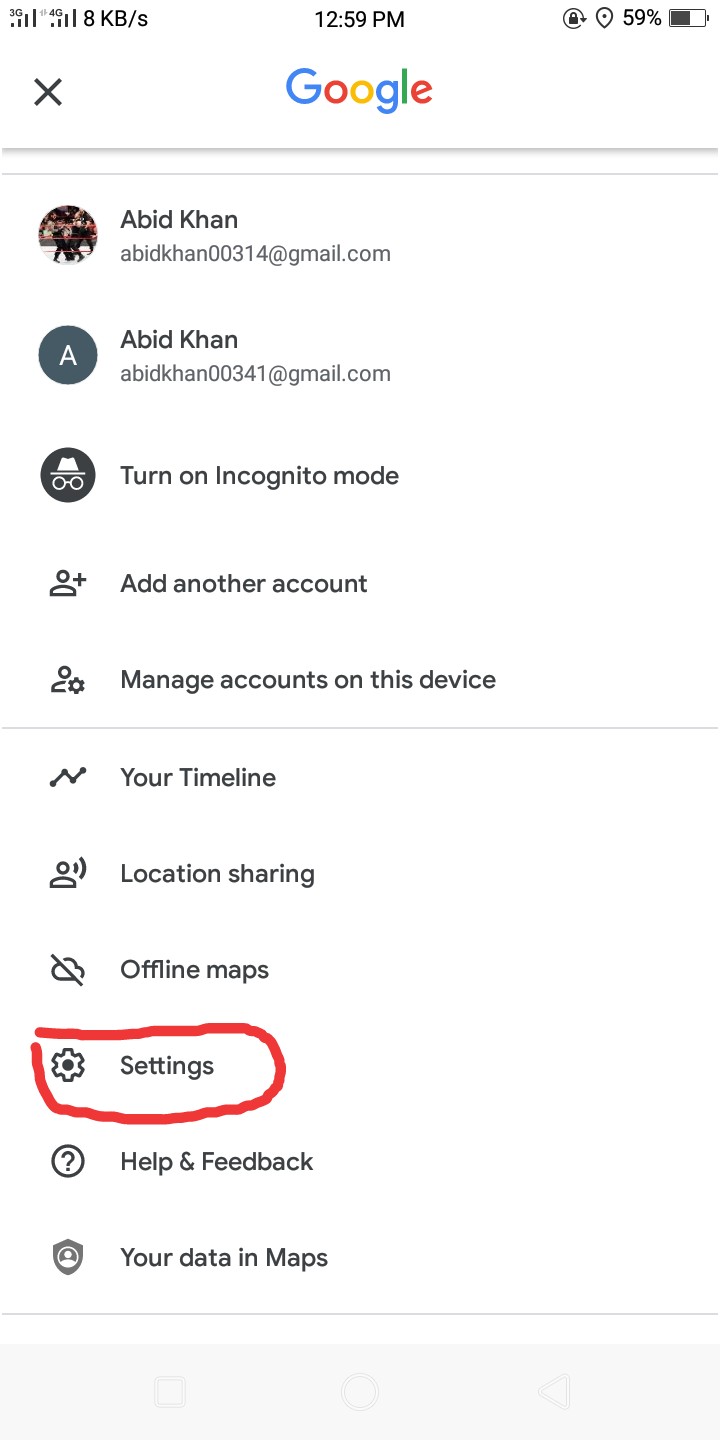
Open Google Maps and head to the most menu by tapping on your user avatar to the proper of the search bar up top. Next, hit "Settings" inside the menu, then select "Edit home or work" on the subsequent page.


Save Home & Work Address on Google Maps For easy direction

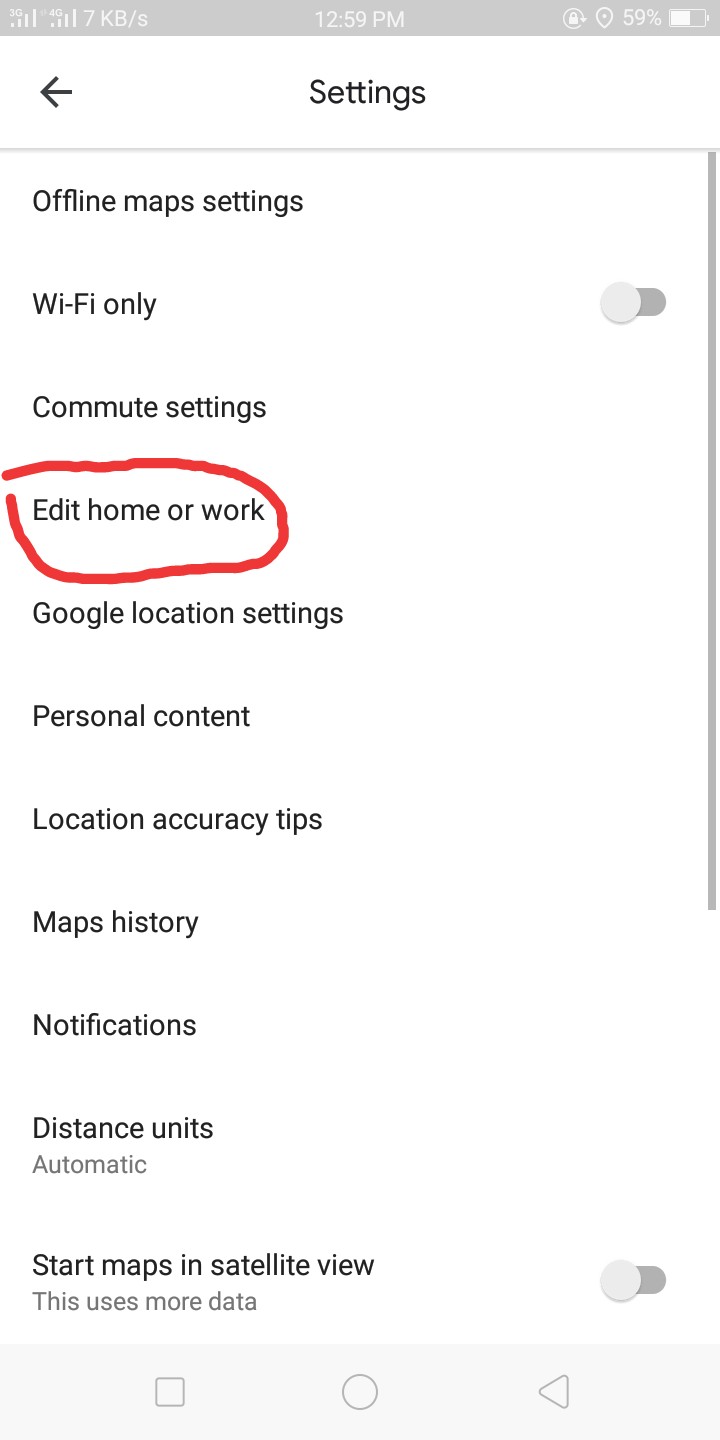
From there, tap on the "Labeled" tab if you are not already in it, then select "Work." Now, here's the secret: don't enter your address. Instead, tap "Choose on map," then pan and zoom to put the blue pin on your home's location and hit "Save." Once done, your workplace will show up as "Dropped pin" within Google Maps.

It's worth noting that Android allows for a more precise placement since the precise address the pin is on appears along the highest as you progress it around, which does not show up on iOS. Finally, the method may be a little more inconsistent on iOS, as dropping the pin on your house to line as your work location will sometimes remove its home status, so you'll need to move the pin slightly.
Read More

Saturday 8 February 2020

How to Enable Developer Options & USB Debugging


Many Android utilities use Android Debug Bridge, or ADB for a brief , to send commands from a computer over to your phone or tablet. This empowers such utilities to run terminal directions that, at times, wouldn't be conceivable on Android without root get to.

Before getting started with an ADB mod on the pc side of things, you will need to enable "USB debugging" on your Android device. But this feature is hidden during a secret settings menu that you're going to got to activate first.

Step 1: Activate the Hidden 'Developer Options' Menu

These settings may vary slightly counting on your device, but the overall gist of it should be about an equivalent. To begin, head to the most Settings menu on your Android device, then scroll all the thanks to rock bottom and choose "About phone," "About tablet," or "About device." From here, scroll down towards rock bottom of the list again, then tap the "Build number" entry 7 times in rapid succession.

For an Amazon Fire device, you'd attend Settings -> Device options, then tap repeatedly on the "Serial number." If you've got a more modern device, sort of a Samsung Galaxy S9 or a Google Pixel running Android P, it's slightly different, so hit those links to ascertain how it's done.

How to Enable Developer Options & USB Debugging

At now, you ought to see a toast message saying that "You are now a developer," which suggests you've unlocked the hidden Developer options menu.

Step 2: Enable 'USB Debugging'

Next, back out one level to go to the most Settings menu again. Near rock bottom of this screen, select the "Developer options" entry that you simply just unlocked. From here, check the box by the "USB debugging" section, at that point press "OK" on the popup. 

How to Enable Developer Options & USB Debugging

At now, your Android device is nearly ready, but the pc side of the connection will get to be configured before you'll fully utilize ADB. For more thereon topic, Windows users can use this guide, and Mac users can start here.

Step 3: Allow USB Debugging Connection

Once the drivers and software are configured on your computer, connect your Android device to your desktop or laptop with a USB data cable. At now, you ought to see a message on your Android device asking if you want to permit this computer to attach. Tick the box beside "Always allow from this PC" on this message, at that point press "OK."

How to Enable Developer Options & USB Debugging

If you do not see this message, it might be thanks to conflict together with your phone or tablet's USB storage connection. If this is often the case, head to your device's main Settings menu, then select "Storage." From here, tap the three-dot menu button at the highest of the screen, then choose "USB computer connection."

How to Enable Developer Options & USB Debugging

From here, if "Media device (MTP)" is chosen, change this feature to "Camera (PTP)" instead. At now, you ought to see the "Allow USB debugging" message that you simply omitted on earlier.

How to Enable Developer Options & USB Debugging

With USB debugging enabled on your Android gadget, you're currently ready to send ADB commands over from your PC. What are some of your favourite ADB utilities? Let us know in the comment section below.
Read More

Wednesday 5 February 2020

3 Ways to Delete Facebook Without Root — No Matter if It Was Preinstalled on Your Phone

3 Ways to Delete Facebook Without Root — No Matter if It Was Preinstalled on Your Phone

Despite years of Client complaints, OEMs are as yet preinstalling third-party application on fresh devices. Even in 2019, you'll still find many phones with Facebook preinstalled. What's worse, it's installed as a system app, so it can't usually be uninstalled without root access. However, there are a few workarounds.

How each manufacturer and carrier installed their bloatware system apps varies, so we've three methods to assist you to remove Facebook and other system apps. We listed them so as of difficulty from most straightforward to the foremost complex, but the third method is that the most surefire way. None of these methods will uninstall the app. Instead, they're going to disable it, preventing any background activities or new updates and removing them from your app drawer. Mainly, the app is laid to rest rather than being killed off.

Method 1: Disable the App in Settings

By far the simplest method is to disable the app within Settings. To accomplish this, open the Settings app and choose "Apps." On newer Android versions, you'll get to tap "See all [x] apps" here to expand the list.

From here, choose Facebook (or whatever system app you would like to remove) to open its App Info page. There are two buttons along the highest of the page, "Disable" and "Force Stop." Choose "Disable" and hit "OK" on the popup. If the "Disable" button is greyed out, try one among the methods below.

3 Ways to Delete Facebook Without Root — No Matter if It Was Preinstalled on Your Phone

Method 2: Use a Package Disabler App

If the primary method isn't possible or if you would like to get rid of quite just Facebook, we recommend employing a package disabler app. These applications can evacuate Facebook as well as a large number of the bloatware applications that OEMs incorporate.

Method 3: Use ADB

The most difficult method is using ADB commands, but it's free and will definitely do the trick. Don't worry though, ADB commands are more daunting than complicated because the process to get rid of system apps is pretty straightforward.

The first thing you would like is ADB installed and open on your computer. Use the link below if you don't know how to accomplish this.

For proper communication between your phone and therefore the PC, you would like to put in USB drivers for Windows devices. Use this link to seek out your phone OEM and follow the instruction on the way to obtain the right drivers. For Mac and Linux users, you'll skip this step.

Next, on your phone, Open Google Play Store and Download App Inspector. App Inspector will provide you with the precise package name of Facebook and the other system app you would like to disable.


3 Ways to Delete Facebook Without Root — No Matter if It Was Preinstalled on Your Phone

From here, open up App Inspector and choose "App List," then tap the Facebook app. The package name is found below the name of the app, starting with "com" or "net" followed by a series of words separated by dots.

3 Ways to Delete Facebook Without Root — No Matter if It Was Preinstalled on Your Phone

Now, connect your Mobile to your PC and Turn ON USB Debugging. Input the subsequent command into the prompt or Terminal, replacing XX with the package name you only located.

adb shell pm uninstall -k --user 0 XX

When done correctly, you'll see a message saying "Success," indicating Facebook is disabled from your device. Note that this does not uninstall the app, because it will return if you ever factory reset your device. If you had any trouble with Method 3, inspect the link below for tutorial describing the way to accomplish this one the LG V30. Except for the primary two steps, you'll follow alongside any phone.
Read More